
All About Copic Markers

Looking for Copic Info?
I’ve gathered the most common Copic Marker questions from my decade of teaching.
For further reading, visit the links to other resources and my own comprehensive articles for deep-dive info, tips, and experience.
(Updated March 2022)
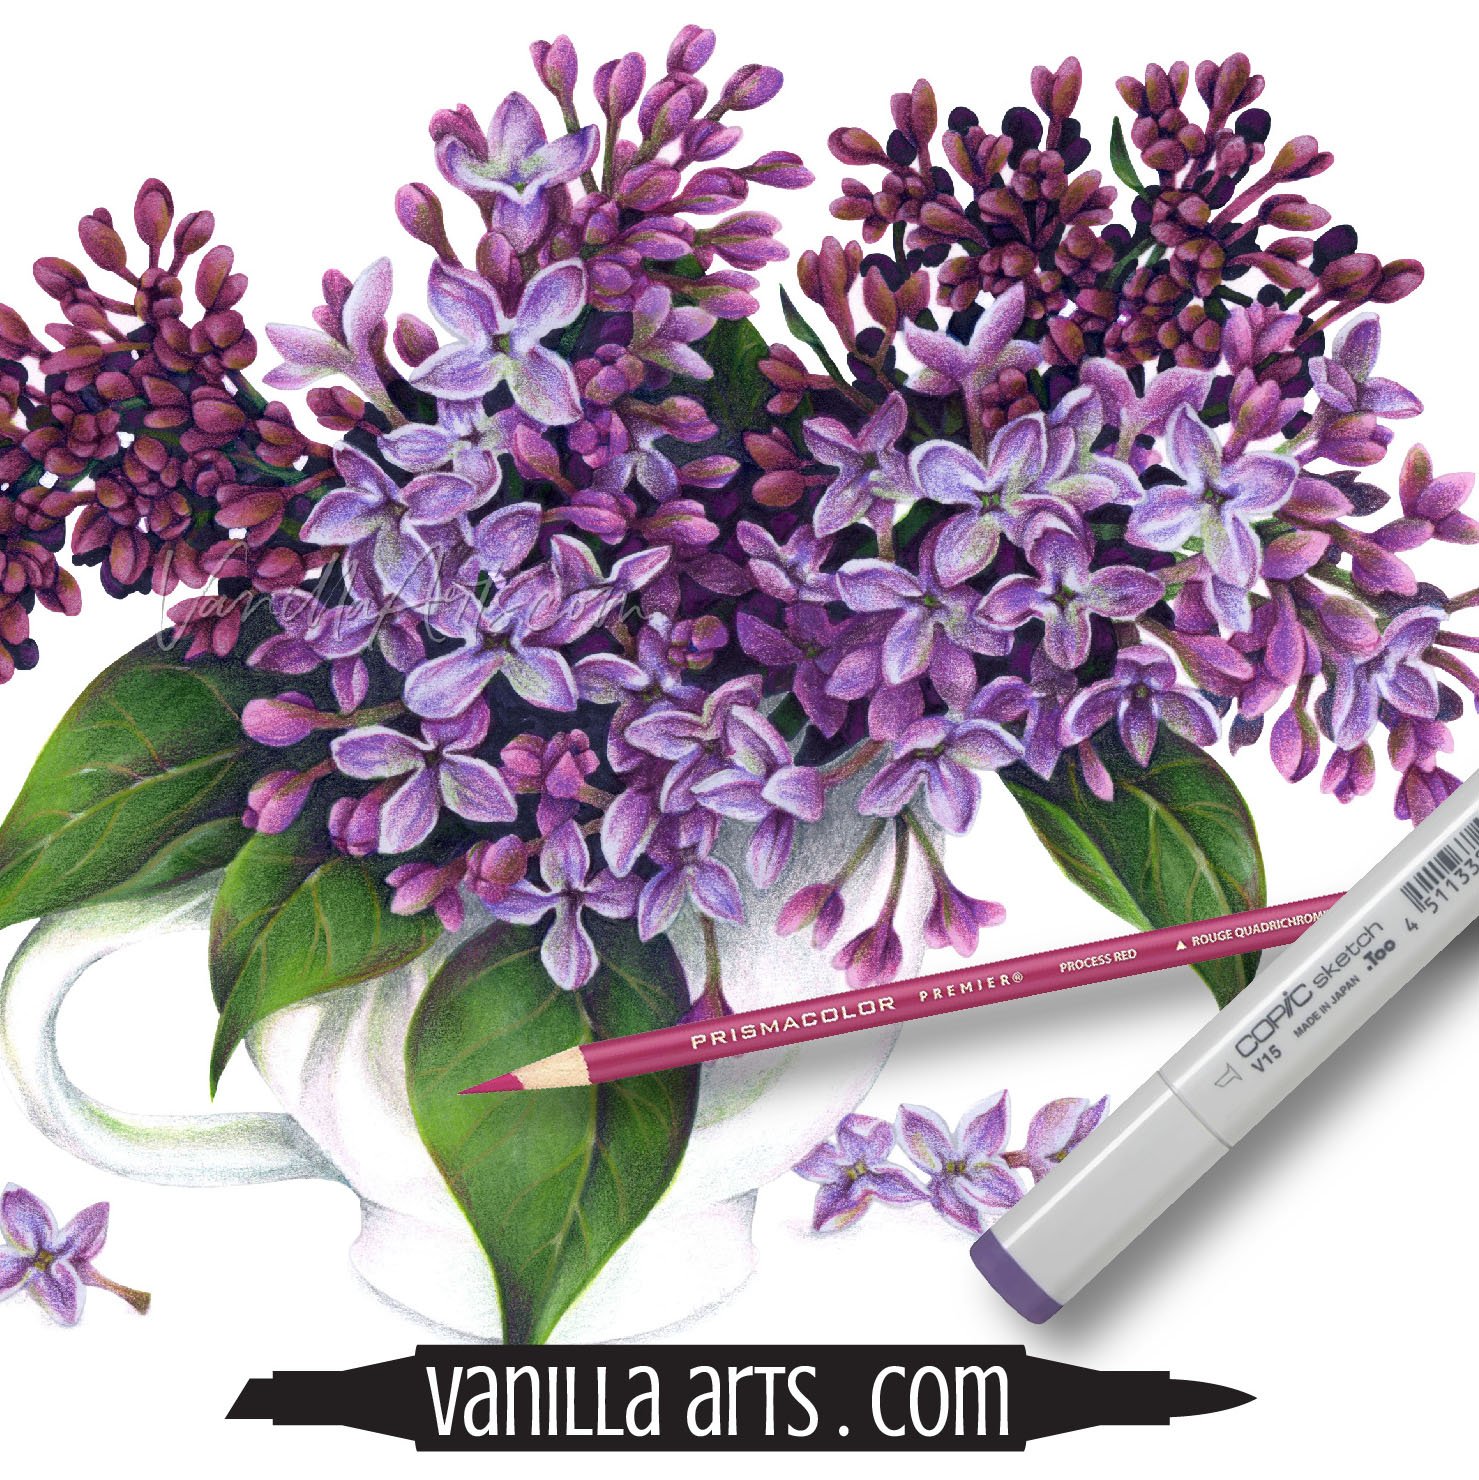
“Sweet Lilac” by the author, Amy Shulke. Image colored with Copic Marker plus Derwent Lightfast and Prismacolor Premier colored pencils. Coloring kit including digital stamp available at VanillaArts.com.


GENERAL COPIC INFO:
-
Copic is pronounced with a long o sound, “koh-pick”. Think of the word “cope” rather than “cop”.
It is not uncommon to hear Americans mispronounce Copic with a short o, saying “cop-ick”. But every company official I’ve talked to uses “koh-pick”. Additionally, if you listen to the videos put out by Too (Copic’s parent company), where the dialog is in Japanese, you can clearly hear the long o version.
Copic is “koh-pick”, not “cop-ick”.
-
Alcohol marker is the general term for any art or utility marker which uses alcohol as a solvent. All marker ink is a combination of color particles dissolved or suspended in solvent. Solvent acts as a carrier for the colorant and evaporates as the ink dries. Common marker solvents include water, oil, acetone, xylene, or in the case of alcohol markers— isopropyl alcohol or ethanol (ethyl alcohol).
-
Copic Markers are an artist-grade alcohol marker used for drawing, coloring, and calligraphy. Copic Ink uses alcohol as a solvent and carrier for colorant. Copics contain both Ethanol and Isopropanol alcohol.
-
Artist grade alcohol markers were originally developed for illustration but modern artists and hobbyists treasure them for their blending capabilities. Alcohol inks are vibrant, lay down evenly, and can be used to create beautiful smooth gradient blends. Alcohol markers are also beginner-friendly, they can be re-moistened to intensify colors or fix mistakes in original ink layers.
Water, oil, and paint style markers tend to be duller in color and do not have the same blending characteristics or reworkability.
For more info on water versus alcohol based markers, read our article here.
-
If you talk to experienced Copic users, you’ll notice we refer to markers by their number rather than the cute color names. This is for several reasons:
It’s faster to find YG0000 than to hunt for “Lily White” which could be many possible colors.
Copic names are often misleading. Many do not resemble the color commonly associated with the name. Example: B23 does not look like Phthalo Blue and R32 is not Peach.
The letter/number combination helps us visualize the value and behavior traits of each marker.
Those who color strictly with blending combinations think in terms of consecutive number sets.
For more on the Copic numbering system, see my in-depth article here.
-
It does not matter which direction you store Copic Markers. Choose whichever direction works best for your storage needs. Many Copic users have strong feelings about upright vs side storage, do not let someone bully you into keeping markers their way based on myth and faulty logic! Copic markers will not leak if stored upright. The top nib will not dry-out because Copic ink does not settle downwards.
-
With proper care including frequent use, routine refills, nib replacements, and regular cleanings, Copic Markers can last indefinitely. Copic Classic, Sketch, Ciao, Wide, and SP Multiliners* are all refillable and replacement nibs are inexpensive and readily available. Your marker never needs to age!
I personally have about 50 Sketch Markers which are over 25 years old!
Copic officially says refill inks have a shelf life of 3 years. Keeping refills out of direct sunlight significantly extends their lifespan.
*SP Multiliners use replacement cartridges rather than refill ink.
-
Copic Markers are acid free. Their primary component, ethyl alcohol has a ph value 7.33 which is in the center of the neutral acid/alkaline range. The remaining ink ingredients which do not evaporate are trace and have ph values between 6-8 (each color measures a unique value).
On the ph scale, values 0-7 are considered acidic with zero being the most acidic. Values 7-14 are alkaline with 14 being the highest alkalinity. 6-8 is the neutral range.
-
To call Copic Markers “non-toxic” is misleading. Early art markers used solvents such as Xylene and Toluene, which are associated with lung, liver, and kidney issues. Copics were invented as a “safer” art marker using Ethanol as a carrier. Copic Markers contain other ingredients which are not considered safe for consumption, inhalation, or cosmetic use on skin.
-
Copic Markers are not recommended for cosmetic purposes or for use on skin. See “Are Copic Markers non-toxic” above for more info. The occasional spill or leakage onto fingers is unavoidable but Copic markers were not designed to be safe for use as temporary tattoos or body decoration.
Spills on skin can be mostly-removed using 70-90% Rubbing Alcohol on a cottonball or clean cloth. Wash with soap and water afterwards to remove residual traces of ink. The dye in several red or dark Copic inks may stain lighter skin, fingernails, and especially the skin around the sides of fingernails for several days.
-
From the invention of the first art marker up until the late 1980s, many professional artists routinely used illustration markers which contained noxious ingredients. Art studios had to be properly ventilated to prevent “marker drunk” scenarios where an artist would feel foggy or woozy from the fumes. You may recall old-style Sharpies and similar household utility markers from your childhood which smelled sweet and caused lightheadedness. These markers had metal barrels.
Copic Markers and Prismacolor Markers were some of the first “non-toxic” markers to replace the original noxious formula markers. They were designed to use safer solvents and they do not off-gas as much as the old markers.
Sensitive individuals have reported mild issues from Copic Markers but I’m personally skeptical about such cases. Would these same people also report feeling lightheaded after sniffing a glass of vodka or gin which are also ethyl alcohol?
Art supplies are not meant to be consumed or directly inhaled. Please practice common sense.
-
Copic Markers are an artist-grade marker. They were originally developed for use by commercial artists for print media and project planning. Copics are commonly used today by architects, landscape designers, fashion and product designers, graphic artists, a wide variety of illustrators, and also for preliminary sketches by fine artists such as painters, sculptors, and glassblowers.
Note: artist grade does not mean “archival” or “lightfast”. Many artist grade products are not archival.
-
Copic Markers are not permanent markers. “Permanent” refers to markers which make indelible marks on surfaces other than paper (such as metal, glass, acrylic, stone, wood, etc.) Copics do not adhere well to most non-porous surfaces.
Copic Markers work best on paper, cardstock, or cardboard, and can be used as temporary color on some fabrics.
-
Copic Markers are an artist grade marker but they not lightfast or archival. Copics were developed for graphic or print artists doing fast temporary sketches and were not intended as a durable, long term medium. Copic ink colors fade at different rates; many are considered fugitive.
To read more about Copic lightfastness, see our article here.
For lightfast test results, please see our Copics Uncapped series here.
-
I do not recommend framing original art made with Copic Markers. Copics are not lightfast or archival, many colors start to show signs of fading after just a few weeks.
UV glass will not stop Copic ink from fading because many colors are fugitive. Fugitive inks fade with time rather than from light, oxygen, or acid.
For more information, read my in-depth article at our sister website, VanillaArts.com.
For framed art— scan or photograph the project and have it professionally printed. A high quality print will look as good as (or better) than the original art.
-
It is unethical to sell Copic art originals without emphatic disclaimers. Copic inks are not lightfast and Copic artwork can fade in as little as two weeks. Framing behind UV glass will not stop fugitive colors from disappearing— see the question “Can I frame Copic art?” above for more info.
If the purchaser has been warned that the artwork is fugitive and must be kept in a dark box or folio… basically, if you’ve done everything you can to educate the buyer, then it’s okay to sell the art. But understand that this sale could one day come back to bite you. People often don’t listen and they forget. Personally, I absolutely will not sell ANY Copic original. I only sell professional quality prints.
Handmade cards are the exception to the rule. Cards— even the fancy, expensive, hand crafted kind— are considered disposable and are unlikely to end up in a frame on someone’s wall. But if you’re selling cards for others to send, this requires the same warnings and disclaimers as artwork. Someone purchasing a handmade card deserves to know it has a limited lifespan.
COPIC MARKER TYPES & DETAILS:
-
Copic features 358 colors and sells all 358 colors as refills. However, several of their marker styles are only available in a limited color range.
Copic Sketch is available in 358 colors.
Copic Classic is available in 214 colors.
Copic Ciao are available in 180 colors.
Copic Wides are only available as an empty marker (blanks) which must be filled with any of their 358 colors.
-
Copic makes 358 different colors. All 358 colors are available in 12ml refill bottles. Copic has never discontinued a color.
To read more about Copic refills, see our in-depth article here.
-
Copic has never discontinued any color. All 358 colors are available in Sketch style markers and Copic Refills. The Classic and Ciao color palettes are limited in size but have never had any colors discontinued.
Copic did make a limited edition 30th anniversary set which contained special “30” colors such as E30, Y30, R30, etc. Some of these colors are real colors while others were invented for the set. These colors were never put into production and no refills were ever created. Because this was a one-time creation, I suppose the colors are technically discontinued… but I still hope to see that Y30 in production someday!
-
Classic Copics are the original Copic Marker developed in 1987 as a marker for drawing and sketching. Classic Copics have a square barrel and are dual ended with a bullet and chisel style nib. Classics are available in 214 colors and refills.
For an indepth look at Classic Copics, see our article here.
-
Copic Sketch Markers are the premium line of illustration markers, developed in 1993. Sketch are dual ended markers with an oval, no-roll barrel shape and feature a chisel and Super Brush nib. The Super Brush nib is ideal for coloring and blending.
For an in-depth look at Skech markers, see our article here.
-
Ciao is the economy series of Copic Markers. Ciao are child friendly in size with a thin round barrel and very colorful caps which have anti-choking features for young children. Ciao markers come in 180 bright colors and feature the same nibs as a Copic Sketch, the Super Brush Nib and a chisel style nib.
To read more about Copic Ciao, visit our in-depth article here.
If you’re unsure whether to purchase Ciao or Sketch style Copics, see our article here.
-
Beware! Copic Colorless Blender markers are not for blending! Many people call them “erasers” but they do not erase!
Colorless Blenders or #0 Copics are filled with Copic’s alcohol solvent (blending solution). They do not contain any colorant. Clear solvent can be used to lighten some Copic mistakes if the color is fairly light. If the mistake is darker, the solvent can push the color to a less noticeable area but it can not erase the color.
Colorless blender pens can also be used to create special effects or to pre-wet an area of paper for insured blending.
WARNING: Attempting to blend two colors with a Colorless Blender Marker will damage your coloring.
-
Wide Copics were developed for lettering large poster style signs and can be used to color large areas like backgrounds. Wides have a flattened oval barrel and a 21mm chisel nib. They are not dual ended as other styles of Copic.
Copic originally offered Wides in 36 colors but discontinued all in 2016. As of today, Copic only sells empty wides (called blanks) which can be filled with any of their 358 colors of refill ink.
-
Copic Multiliners are a technical fine-line pen filled with Copic compatible drawing ink. They are available in nib sizes ranging from .03mm to 1mm plus a few novelty brush styles including fude and a fountain style drawing pen. “SP” is a series of refillable Multiliners. Depending upon the style, Multiliners can come come in black, warm and cool gray, sepia, wine, cobalt, and olive.
Note: over the years, Copic has released a variety of Multiliner colors including Sakura Pink, Lavender, and a bright rainbow set. They have been discontinued.
-
Copic offers empty markers called “blanks” in Sketch and Wide styles. You can fill them with any of Copic’s 358 colors of ink or mix your own custom color.
-
Prior to 2019, Copic Refill Inks were referred to as “Various Ink”. The bottles were redesigned in 2019 and new bottles were labeled “Refill Ink” rather than Various Ink.
To read more about Copic Refill Inks, see our in-depth article here.
COPIC MARKERS FOR BEGINNERS:
-
Are you ready to purchase your first Copic Markers?
Are you starting your marker collection?
Unsure about which boxed set to purchase first?
Want to build a small yet versatile economy collection?
Read my Beginner’s Buying Guide article here and download the recommended starter color list.
-
Copic Markers come in several sized box sets, including 72, 36, and 24 color assortments. Which one works best for beginners?
Read my Beginner’s Buying Guide article here and download the recommended starter color list.
-
Ciao and Sketch style Copic Markers appear to be interchangeable to beginners and inexperienced users. Both feature a Super Brush Nib and a Medium Broad (chisel) style nib— the only difference seems to be price. Ciao markers typically cost $2-3 less than the same color in Sketch; so it sounds frugal for beginners to build a larger collection with Ciao.
Warning! Ciao markers may not be the value you expect!
Read more about Ciao vs. Sketch in my deep dive article here.
-
Copic gray markers can be used to underpaint bright or light Copic markers— this is a way to mix colors you need rather than purchasing more markers. Toning colors with gray also creates colors Copic does not make, helping artists color with greater realism. In short, grays extend your purchasing power by working under many other colors.
We recommend starting with the N (Neutral) grays. It is not necessary to purchase all N markers, skip every other number (all evens or all odds). The value difference between consecutive numbers is very small and the times you will use two consecutive numbers next to each other in the same project are rare.
N0, N2, N4, N6, N8, and N10 make for a great starter gray set.
All even or all odd W (Warms) and C (Cools) would be your next expansions. Then fill in the gaps to build a full collection of N, W, and C grays.
We do not recommend purchasing T markers unless you work professionally in print media. T (Toner) markers were intended to match the toner found in commercial copy machines. The times when a hobbyist needs to color on a printed copy are truly rare.
-
A Copic Blending Combination (or combo) is two or more markers which can be blended together to create a gradient. Most blending combinations involve three markers— a light, medium, and dark version of the same general color. For small areas you may opt to use just two markers. For large objects or coloring with realism, the artist may use 4, 5, or more markers to create the gradient.
Colorers often refer to “blending recipes” which is a sharable list of the markers used in a combination.
A typical blending combination could be G28, G24, G21. Blending combinations can also be non-sequential such as G28, YG17, YG03, YG21.
-
Copic Natural Blending Groups (or combinations) are two or more sequential markers from the same color family.
Example: R29, R27, R24, R22, R20.
Notice how the numbers all start with R2? In a natural group, only the last number changes.
-
Copic Markers do not work well on standard school or office grade paper. Writing and printer papers are usually made with wood pulp. Wood does not absorb ink well. You will see bleeding and soak-through with wood based papers.
Paper designed for markers tends to have a higher cotton fiber content. Cotton not only absorbs more ink but it allows the ink to stay wet longer to facilitate better blending. Thicker paper also increases absorbency and further slows the drying time. Additionally, marker paper is polished which helps ink glide across the surface for smoother color.
Experiment with the various papers you find because there are always exceptions to the rule. But to be honest, I’ve never encountered an office or student grade paper worth coloring on.
For paper recommendations from 4 Copic Marker instructors, see my in-depth article here.
-
Copic markers can be used on any uncoated, smooth paper… but users will see less bleeding, feathering, seep-through as well as noticeably smoother blends when they use a thicker, polished paper designed specifically for markers.
We asked four Copic instructors for their paper recommendations. Read more here.
-
We do not recommend using blotter or scrap paper between your project and the desk.
The smoothest and best looking Copic blends require moisture. Ink particles can not move without adequate moisture or if the ink dries before the blending has finished. Placing scrap paper below your project helps to dry the ink faster by pulling moisture out the backside.
For the best blending, we recommend coloring on top of a smooth non-porous surface such as glass, acrylic, or enamel coated metal. These surfaces slow down the evaporation process, keeping your project wet longer, allowing the inks to blend and smooth themselves.
-
The trick to coloring smoothly with Copic Markers is to use more than one layer of ink.
Copic color gets richer and more vibrant with every layer. A single layer of ink will always look uneven because stroke-overlaps are actually double or triple layers of ink.
Experienced artists and colorers typically use 4-5 layers of ink, especially when using blending combinations. Building multiple layers not only eliminates streaks, blotches, and patchy edges but it also hides the directionality and texture of their strokes.
The other factor to keep in mind is that Copic nibs only come in one size. Areas over 3-4 square inches are difficult to color smoothly because one side will dry before the entire shape is filled in. With a larger nib, it would be much easier to color large areas like backgrounds smoothly.
It’s not always about talent or technique. Sometimes a small marker nib is simply the wrong tool for the task. Copic nibs limit the size of your projects.
For more info on coloring large streak-free areas, see my in-depth article here.
COPIC MARKER MAINTENANCE:
-
All Copic Markers are refillable— this includes Classics, Sketch, Ciao, and wides. Copic also sells replacement nibs for every nib style. Together refills and replacement nibs can keep your markers in like-new condition.
Copic SP Multiliners also feature replacement nibs and refill cartridges.
Regular Multiliners (plastic barrel) and Copic Brush, Fude, and Drawing Pens are considered disposable and not refillable.
-
Creating smooth blends with Copic Markers requires moisture— a Copic does not have to be fully dried out or dead to drastically affect your blending ability. For best blending, we recommend “topping off” your markers every 2-3 uses to keep the markers as close to factory weight as possible.
Waiting until a Copic squeaks or leaves pale streaks runs the risk of damaging your marker but you’ll also have serious blending issues long before the marker runs out of ink.
Read more at VanillaArts.com:
Popular Copic Myths (including waiting to refill until a marker squeaks)
We test how long a marker lasts and when blendability starts to suffer.
-
Copic Markers can be refilled an infinite number of times. I personally have Copic Markers more than 20 years old which have been refilled countless times.
Too (the Copic parent company) says individual refill bottles can refill a marker up to 9 times but this is misleading. You’d get 9 refills if you completely drained your markers of all ink before refilling, something nobody would ever do.
For best blending, refill your Copic every 2-3 uses to keep the marker as close to factory weight as possible.
Read more about how marker weights affect your blending ability in my in-depth article here.
-
Copic Markers nibs are both connected to the same ink receptacle (called a core) located in the barrel of the marker. Ink circulates freely with the nibs and core acting as a single unit. You can not refill just one end. When a nib dries-out, this is a sign the entire marker is dangerously low on ink and should be refilled immediately to prevent further damage. Hardened nibs may also need to be replaced.
-
Do not refill Copic Markers with anything but Copic refill ink. Adding rubbing alcohol to your Copic will ruin the marker rathe than extend its life. Copic Markers are made with Ethyl alcohol while rubbing alcohol is a combination of Isoprophyl alcohol and water. Not only is the alcohol a complete mismatch but the water will damage the marker beyond repair.
-
DO NOT clean Copic Marker nibs with rubbing alcohol! Do not clean any brand of alcohol marker nibs with rubbing alcohol. Rubbing alcohol will damage alcohol markers.
Most alcohol markers use Ethyl alcohol. Rubbing alcohol is Isopropyl alcohol. They are not the same thing.
Rubbing alcohol also contains up to 60% water in some formulas. Water will ruin the ink inside the marker and also changes how the marker behaves.
It is important to understand that marker nibs are not closed systems. Marker nibs are directly connected to the storage core inside the marker. Ink circulates freely between the core and nibs. To introduce water to a nib insures some amount of water will migrate into the core.
The only safe way to clean a marker nib with rubbing alcohol is to let the nib dry completely before re-inserting it into the marker. Given that nibs are designed to retain liquids, it can take many days to fully evaporate.
We do routinely clean marker caps and marker bodies with rubbing alcohol but we are very careful to avoid contact with the nib.
-
Copic nibs do not last forever. When a brush nib leans to one side or bends excessively during use (feels soft and wobbly), the nib can not be fixed and must be replaced. Bending and/or a lack of elasticity are a sign that the fiber core below the felt layer has broken down to the point where it can no longer support accurate coloring. Bendable nibs are also prone to leakage and spills.
Note: All nibs eventually wear out but if you find yourself routinely replacing bent nibs, you may want to adjust your marker grip and coloring technique. Brush nibs are not fragile and can be occasionally bent but heavy hand pressure wears-out nibs faster than necessary. Heavy pressure is not necessary for drawing or blending and can cause health issues such as Carpal Tunnel Syndrome.
-
Marker nibs do not last forever! Paper feels smooth to the touch but under a microscope, the surface is rough and jagged which tears away fibers from felt nibs with every use. The more you use your markers and the rougher the paper, the faster you’ll need to replace the nib.
Replacement rate is also effected by the amount of pressure you use when you draw or color with a marker. Those who routinely use heavy pressure will see dents or bends in their nib faster than those who barely press.
Nibs do soften and lose their spring with repeated use. Heavy pressure and daily use will soften a nib faster.
Replace any nib which has become contaminated with dirt, dust, or foreign color from other art supplies.
Replace any nib with dead zones— white, light, or sticky dark areas where ink no longer flows through to the paper.
BULLET NIBS: Replace the nib when you notice softness, loose fibers, or if the nib becomes dented or deformed.
CHISEL/BROAD NIBS: This is largely up to taste. Artists typically want to soften these nibs for better ink-flow and more consistent strokes. A broken-in nib becomes too soft when the nib bends or splays more than the artist wants it to.
BRUSH AND SUPER BRUSH NIBS: Replace the nib when the point becomes rounded over. Replace any nib which leans to the side when not in use. Replace nibs which lose their spring or feel floppy or soft against the paper. Also replace any brush nib which releases excessive ink when pressed to the paper with normal pressure.
Note for Super Brush Nibs: I typically trim loose hairs from the point rather than replace the nib. Trimming buys me a little extra time by restoring the point. Do not trim into the actual felt, only the fibers which are no longer resting tight to the felt.
ColorING WITH COPIC MARKERS:
-
Copic Marker blending is not something which can be taught in a short article. We highly recommend taking a local class for personalized instruction. Online classes are less personalized but still beneficial. Free online videos are helpful but lack the feedback you’ll need to learn efficiently.
Watch Amy from MarkerNovice.com blend in this video.
Amy’s beginner classes here (flicking for blends) and here (blending for dimension). Her 12 week Copic course is here.
We also recommend Michelle Houghton’s Copic College here.
-
Coloring skin is the most-requested lesson from beginners who assume they need specific colors to create the look of realistic skin. The truth is, there are hundreds of excellent recipes for skin tone already on the internet.
More important than the recipe is HOW to color facial bone structure and WHERE to place the lights, darks, and undertone colors to create dimensional faces. Please see our free videos for how Amy colors pleasing beginner/intermediate faces:
-
Copic Markers can be used on some higher quality coloring books but for the most part, they do not work well in cheaper, mass-market books. Look for thicker papers printed on one side only with a polished or ultra smooth surface. Testing each book is the only sure way to know if Copics will work.
Most coloring books are printed on manila style paper which is terrible for Copic Markers. Manilla has a high wood-fiber content; wood encourages ink to feather and does not absorb as much liquid as cotton fiber papers.
Many Copic users remove coloring book pages, then use a toner-based copy machine to print the line art onto their favorite maker paper. This can be done at home or professionally at copy shops or office supply stores. Other coloring book fans trace the image onto marker friendly paper using a lightbox or leaning against a well lit window.
-
In general, white-out is best used to camouflage or mask mistakes in white areas of your coloring.
White-out is an acrylic masking product, not brand new paper— therefore, it’s not a fresh start after making an ink mistake. Copic Marker ink does not adhere properly to white-out and colored white-out will always look paler, less vibrant, and highly obvious. Additionally, when coloring over white-out, extra Copic ink tends to gather around the edges of the white-out which further enhances the look of a foreign patch.
See below in the Product Compatibility section for a discussion on using Copics over white-out.
TROUBLESHOOTING COPIC MARKER ISSUES:
-
Copic Markers bleed* when used on incompatible paper. This is not a marker issue, it’s due to paper incompatibility.
For best marker blending with no bleeding, select an ultra-smooth polished paper, something even smoother than a hot press finish. Thicker papers like cardstock or bristol tend to work better than standard-use paper. Thicker papers dry slowly allowing more time for alcohol ink to blend smoothly.
Coated papers (like those sprayed with sizing, metallic or pearlized plastic, teflon, or photography polymer sprays) are incompatible with alcohol markers. The coating can clog the pores of felt marker nibs.
Office grade copy/printer papers are unsuitable. They are designed to dry extremely fast to prevent wet copies from smearing each other as they leave the printer. Copics require a slow drying paper for best results.
For more info plus brand recommendations from 4 Copic instructors, see my article here.
_____
“Bleeding” is an all-purpose phrase. Bleeding can refer “feathering”— when ink travels out beyond the outline of a shape. Bleeding can also refer to leak-through or seeping— when ink saturates the paper to the point where it exists the backside of paper, damaging the surface below.
-
If your Copic Marker was made before 2019, the reason for it drying-out is likely user error. Failure to properly cap the marker is one cause but also, many people neglect to refill their markers promptly. Beginners and infrequent-colorers often do not realize how dangerously dry their markers actually are. With little ink in the core, it doesn’t take long to harden beyond repair.
Newer markers (post-2019) seem to have a higher failure rate for undetermined reasons. Copic has not officially admitted the noticeable surge in dying markers.
People often suspect “micro cracks” in the marker body but personally, I think the issue is due to a change in the hardness of the plastic used to hold the nibs in place. This cone shaped plastic piece also has the airtight lid-locking ridges. Because the cap fails to seal, the marker dries out quickly, often before the marker has been used. Both micro-cracks and my seal theories are speculation. To date, we do not have a proven answer.
Read more about keeping your Copic Markers properly full in my in-depth article here.
-
Sticky nibs are the result of a marker which is drying-out slowly. Copic Marker ink is a combination of dye and solvent (alcohol). If you leave the cap off a marker, only the solvent evaporates. The remaining residue (dye) is dark and sticky. The dye eventually cures into a hard crust but the sticky phase is what most people notice as it gathers inside the marker cap or along the sides of the nib or the nib housing.
Keep your markers properly filled with fresh ink and keep the inside of caps clean to minimize stickiness.
Rubbing the nib against scrap paper can remove small bits of stickiness. We recommend doing this because darkened ink can transfer to your project and cause ugly streaks. Be sure to promptly refill your marker or the stickiness will return. Personally, I replace any nib with stickiness because odds are there are other sticky areas on the nib you can’t see and more are probably coming. I do not want to risk ruining a project with dark streaks.
Some people recommend cleaning a sticky nib by soaking it in Copic Colorless Blender solution. In my experience, this does not work. Even if it did, the cost of the blending solution used exceeds the price of a replacement nib.
Once a nib is fully dark and 100% sticky, you need to consider replacing the marker. The nib and the core inside the Copic are connected and made of similar fibers— if one is sticky, so is the other. You can not clean or replace a sticky or hardened core.
-
I do not recommend wasting time trying to revive a dead marker. There are many Copic users who advise soaking the marker or flooding the marker with fresh ink “to melt” the dried ink inside.
Soaking and flushing will NOT work. Why not?
Copic ink contains resin. When a Copic dries out, the resin in the marker core fully hardens. Cured resin can not be rehydrated without applying stronger solvents and heat. You could soak a Copic core in colorless blender solution or fresh ink for years and it will never soften or melt away!
Once a core has hardened, the marker will never hold ink properly again.
Throw the marker away instead of wasting expensive ink or blending solution trying to revive the dead marker.
-
Unlike many other nib issues, nib crystallization is completely due to manufacturing errors. Copic ink is primarily a mixture of dye and alcohol solvent but it also contains resin, oils, and salts. Crystals are a sign the ink mixture is separating. This should not happen to properly made ink!
I’ve seen several types of Copic crystallization:
the entire nib has a hard glossy coating, it almost looks like glass
glassy looking crystals formed at the base of a brush nib
a pale, crusty, dried foam at the base of a nib or up on the point of a brush nib
a pale dusty coating over the entire nib which almost looks like mold
I do not recommend rescuing a marker which contains separated/separating ink. To clean the marker, you’d have to flush the entire core of 100% of the bad ink and replace it with completely new ink. I estimate the cost of flushing a marker to be 5-6 times the price of a new marker.
Reputable retailers should replace your marker with proof of purchase, they can then deal with their distributor who then deals with Copic. I’ve heard smaller retailers are more likely to accept these returns than bigger chain stores.
I’ve heard sad stories of people unsuccessfully trying to contact Copic directly.
Personally, I’ve had 2 markers crystalize (one developed foam, one glassed over). I did not attempt to return them, I threw them away and bought replacements. To wait on hold or argue with a store cashier was not worth my time.
Note: if your marker has been refilled several times, the refill ink may be at fault, not the ink which originally came inside the marker.
-
See the question and answer about a “dark and sticky” nib above.
-
Copic Markers which are dangerously low on ink leave blank streaks. This happens when the core inside the marker barrel is so dry that it can no longer keep the nib fully moist. Refill your marker as soon as possible to prevent further damage. In the future, do not wait as long between ink refills.
Read more about what happens to your coloring when you postpone refilling in my article here.
-
The Copic chisel nib is under-appreciated because so few people understand it. Chisel nibs are made from compressed felt, they are very hard and firm. In this hardened state, the full length of the nib can’t make contact with the paper, thus it leaves pale or un-inked streaks.
A factory-fresh chisel must be seasoned and work-softened before it will work properly. Sadly, most users never use their chisel enough to experience the feel of a properly softened chisel.
To break-in a chisel nib, simply use it! Practice drawing lines and strokes with the long side, with the point, and with the corner of the point. The more you use a chisel, the softer the edges become. After a while, your slightly fuzzy chisel nib will start to leave wonderfully lush and vibrant strokes.
In art school, broken-in chisel nibs were highly treasured, especially for lettering classes. To lose a seasoned marker was worth more than a few tears!
Love your chisel nib and it will love you back!
I have an online class devoted to learning your chisel nib. See the class description here.
PRODUCT compatibility- Can I use it with Copic markers?
-
You can draw with office, school, or artist grade graphite pencils and then color the project with Copic as long as you take special precautions.
Technically Copic Markers are not compatible with pencil. Graphite will stain your Copic nibs but the staining is more cosmetic than dangerous. I have several contaminated Copic nibs and occasionally I see a bit of graphite transferred to other projects but it’s not dark or noticeable to anyone but me. I have smeared a few lines though and regretted not being more careful.
How to use Copic with graphite pencils:
Draw lightly. Pressure not only adds extra graphite to the paper, it also digs valleys and scars into the paper which then absorb ink differently. Many scars look like a stripe of darker color.
Draw with confident lines rather than using lots of sketchy strokes. You’ll need to fully erase all unused strokes but many erasers embed invisible residue into the paper fibers which can then resist Copic ink. It’s safest to use fewer lines.
Minimize pencil details. As mentioned above, extra lines require extra erasing. Draw only the lines you need.
To minimize the look of your necessary lines, use a kneaded eraser to roll over the lines, lightening their appearance until you can just barely see the line. This step is essential because Copic ink contains resin. When you color over graphite, resin will seal the graphite onto your paper preventing erasure later. Note: you will change lines slightly as you color, either accidentally coloring outside a line or by improving the position of a line. DO NOT count on being able to cover all your pencil lines with a fine-line pen later! In 30+ years of coloring, I have never inked an image exactly as I penciled it.
-
Micron Pens are not compatible with alcohol markers. If you color over the top of Micron Ink with a Copic, you will smear the color and transfer Micron ink to your nib which can then smear on other projects. If you must use Microns with Copic Markers, safe the Micron until after all the Copic areas have been completed.
I understand this is controversial. Many internet experts recommend Microns and claim they are safe but note how they treat Microns:
“Let the Micron ink dry thoroughly before adding Copic.”
“Let the Micron lines cure over night.”
“Heat set all Micron areas before using Copic.”
If Microns were truly safe for use with Copic, then Copic ink would NEVER smear Micron ink!
WARNING: There is no powder, spray, or other product which can transform Micron ink into Copic safe ink. Heat setting and curing does not work!
I have two theories about how some artists/colorers are able to get away with using Microns with Copic:
They’re coloring with darker value Copics so they can’t easily see the Micron lines smearing.
If you use a more absorbent paper, perhaps one which wasn’t designed especially for markers, the paper wicks most of the Micron ink into the center, preventing friction from loosening most of the Micron ink.
Copic ink smears Micron ink on both of my favorite marker papers— X-Press It and Cryogen. In addition, Micron ink can be erased with a standard white eraser from my favorite drawing papers— Beinfang Layout and Copic BleedProof.
Personally, I have banned Microns from my local classes because I’ve seen too many people accidentally forget and ruin their marker by coloring over Micron.
-
If you enjoy coloring rubber-stamped images, please be careful when choosing which stamp ink to use with Copic Markers. Most stamp inks are not Copic safe and will damage your Copic nib. The alcohol in Copic ink loosens the stamped ink from the paper and transfers it to your marker nib where it can be smeared on this project or even future projects.
If you pick up unsafe stamp ink with your Copic nib, replace the nib before further use.
WARNING: There is no powder, spray, or other product which can transform a stamp pad into a Copic safe ink pad. Heat setting and curing does not work!
Please note, I am not a rubber stamper. I color hand drawn images and digital stamps. So I am not an authority on every Copic safe stamp pad nor do I keep up with the latest ink pad releases. I will list the most well known brands which are/are not safe for use with Copic. Also keep in mind that as with Micron Pens, I do suspect that paper affects the amount of smearing which happens. To me, if an ink is only safe on some papers, it should be classified as unsafe to avoid accidents and confusion.
SAFE STAMP INKS:
Tsukineko Memento Ink Pads (When I teach with stamps, this is the only brand I use. I prefer London Fog over Tuxedo Black.)
Ranger Tim Holtz Distress Ink Pads
Ranger Adirondack Dye Ink Pads
My Favorite Things Hybrid Ink Pads
Hero Arts Hero Hues Ink Pads
NOT SAFE FOR USE WITH COPIC:
Tsukineko Versafine Ink Pads
Ranger Archival Ink Pads
Stampin’ Up Ink Pads
Tsukineko Stayz-On Ink Pads
-
In general, most white gel pens, paint pens, and white pencils are not compatible with Copic Marker. This means you should not color over the top of the white product with Copic as the nib may loosen, pick up, and smear even dried white ink. Instead, wait until your Copic work is finished, then come back and use white pen at the end.
Copic does make a white ink but we find it to be thick, clumpy, and expensive compared to other white ink. Copic Opaque White is applied with a paintbrush (or the nail polish style brush) which adds to the difficulty of this product.
Which white products do we recommend for use over Copic? See our article here.
-
In general, correction fluids are best used to camouflage or mask mistakes in white areas of your coloring.
White-out is an acrylic masking product, not brand new paper— therefore, it’s not a fresh start after making an ink mistake. See the discussion about correcting mistakes with white-out in the Coloring with Copics section above for masking mistakes.
See the discussion in this Compatibility section about using Copics with acrylic paint for more information about the physical reactions between acrylic and Copic.
Here is why we do not recommend using any type of correction fluid with Copic Marker:
Depending upon the brand, correction fluid may not be safe for use with Copic Markers. Most of the more matte products will transfer white residue to your Copic Marker nib, even after they’ve fully dried and cured.
We can’t even say it’s safe to use correction fluid as a top layer. I’ve seen badly damaged projects where the artist has used white-out pens for highlights instead of white acrylic ink. The Copic color below the white-out leeched upwards over time, tinting the correction fluid. Eye highlights made with white-out can turn pink, lavender, pale blue, or neon green over time.
-
Copic Markers are compatible with many other brands of alcohol markers. Your success at mixed-brand blending depends largely upon the characteristics of individual ink colors rather than the brand. Some colors are more stubborn than others and even within a single brand, not all blend equally well. Mixing brands decreases your odds of smooth success but many colors can work together.
Copic Markers are NOT compatible with markers using other types of solvent. This includes markers using using water, oil, xylene, or acetone. Copics are also not compatible with acrylic, poster, or gouache paint markers.
Do not attempt to blend Copics with Sharpies, Crayola Markers, and do not use with ball point pens as these will damage Copic nibs.
-
Do not attempt to blend Copics and Sharpie markers together. Do not color with Copic over a layer of Sharpie. Do not outline your work with a thin Sharpie and then color it with Copic.
Sharpies contain oils and other ingredients which will damage your Copic. Sharpie ink can stain a Copic nib, transfer stained color to other drawings, and contaminate the Copic ink inside the nib.
If you must use Copics and Sharpies together, do the Copic layers first. Then add Sharpie over the top of your completed Copic layers.
-
I specialize in realistic and artistic art using a mixture of Copic Marker and colored pencil. Copics are NOT compatible colored pencil but if you plan your layers properly, you can use them on the same project.
Note: Copic Markers are not compatible with any brand of colored pencil. This isn’t a case of finding a brand which works— by their nature, the two mediums do not want to mix.
The problem is that all colored pencils contain wax, even oil based pencils contain a small percentage of wax. Wax doesn’t melt on contact with alcohol but it does soften. Softened wax will clog Copic nibs, eventually blocking enough pores that the marker ceases to function.
Granted, it takes a lot of coloring to clog a nib. One touch won’t ruin a nib, you’d have to color over a penciled area several times to pick up enough wax to kill the nib. But it’s a real thing and it does happen.
Here’s how to work smart:
Do not attempt to blend Copics and colored pencil together into gradients. Layer rather than blend.
Always use pencil over the top of Copic. Do not use Copic over the top of pencil.
Completely finish all Copic areas before adding pencil.
Resist going back to add more Copic over a finished pencil layer.
To learn how I use Copics with colored pencil, visit any of the online classes in the Vanilla Arts Workshop here.
-
I frequently combine Copic Marker with watercolor. The two mediums produce similar results and can flow seamlessly into a cohesive look which looks more like pure watercolor than mixed media.
Note: this applies to transparent, staining watercolor only. Read further for a warning about granulating or opaque watercolor.
I tend to use watercolor layers to cover large expanses and as foundational color, then develop details with marker.
You can use either medium first, but plan your process ahead of time as marker will not work properly on wet or even slightly damp paper. Even the slightest bit of moisture will result in pale spots rather than vibrant color.
Copic ink contains a few ingredients which can act as a slight resist. It varies by color and color value. For this reason, I almost always start with watercolor.
Paper incompatibility is a problem and contrary to the name, “mixed media” paper is not well suited to either medium.
I recommend hot press watercolor paper for marker/watercolor projects as markers do not perform well on cold press or rough papers and because water will damage most marker papers.
Keep in mind that watercolor paper is highly absorbent and drains markers shockingly fast. Also, the fiber content of watercolor paper will complicate blending. Most watercolor papers are highly staining which means they hold onto your first layers of ink and are reluctant to release these color particles during the blending phase. Truly smooth maker blends are significantly harder on watercolor paper.
WARNING: Granulating, sedimentary, or opaque watercolor and gouache are not compatible with Copic Marker. Like pastels, any product which uses unbound powder pigments can be smeared by markers and can clog marker nibs. If you want to combine markers with granular watercolor or gouache, finish all marker layers before starting the paint layers.
-
Copic looks beautiful when combined with pastel but the two mediums are not compatible and must be used in a specific order to prevent damage to your markers.
Always use Copic Markers first and make sure the marker layers are completely finished before adding any pastel. Never use Copic over the top of pastel.
Pastel is a loose pigment powder which relies on a secondary sealant or fixative to help adhere it to the paper. By sweeping a Copic Marker nib over the top of pastel, the nib will pick up pigment, smearing it or transferring it to other areas or even later projects.
Sealing the pastel layer with fixative first does not help because the solvent in markers can soften or loosen the fixative, which then can clog the pores of a marker nib.
The last issue with combining Copic and pastel is which kind of paper to select. Markers work best on ultra-smooth, practically toothless paper while pastel requires tooth to adhere. Finding a paper which works well for both marker and pastel will require a serious compromise for both mediums and may force you to develop alternative techniques. Most mixed media artists lean towards toothy papers because pastel looks amateurish on smooth paper. Understand that toothy papers will use excessive amounts of marker ink, will compromise your ability to blend smoothly, and will wear down your marker nibs faster than smooth papers.
-
Copic Markers are generally not compatible with acrylic products. I say generally because the range of acrylic products is vast (with new products constantly coming onto the market), so it’s hard to say there are no compatible products.
Alcohol tends to soften acrylic bonds and the friction of coloring back and forth over an acrylic painted surface speeds this process. Therefore, I would never color over the top of acrylic paint without being prepared to badly damage a marker nib.
Layering marker over acrylic is actually rather futile as dried acrylic is not very porous. Marker simply doesn’t want to stick to acrylic layers and when it does, the color is weak and doesn’t layer well.
You can safely use acrylic products over the top of finished marker layers providing that the paint is not excessively watery. Water tends to melt most marker friendly papers, so in this case, using a thicker, less diluted acrylic product reduces the odds of buckling or pilling.
Copic’s Opaque White is a standard acrylic ink for markers but there are many other white acrylic products which work the same. Used as a top layer, acrylic white is best reserved as surface decoration like sharp highlights or small white details rather than painting large areas. Most dry acrylic white products will not ruin a marker nib but as mentioned above, they also don’t accept color well. Copic ink over the top of Copic Opaque White will always look significantly paler than the actual ink color.
-
Copic Markers can be used with some higher quality coloring books but for the most part, they do not work well in cheaper, mass-market books. Look for thicker papers printed on one side only with a polished or ultra smooth surface. Testing each book is the only sure way to know if Copics will work.
Most coloring books are printed on manila style paper which is terrible for Copic Markers. Manilla has a high wood-fiber content; wood encourages ink to feather and does not absorb as much liquid as cotton fiber papers.
Many Copic users remove coloring book pages, then use a toner-based copy machine to print the line art onto their favorite maker paper. You can print at home with a toner or laser printer or have copies professionally made at a copy shop. Other coloring book fans trace the image onto marker friendly paper using a lightbox or leaning against a well lit window.
-
Copic Markers will always work best on paper which has been formulated specifically for markers or art papers which can hold ink moisture long enough to facilitate blending. Like coloring books, the quality and kind of paper varies largely by brand.
There are two major downsides to using Copics in journals— Copics tend to bleed-through most journal pages but they also tend to contain wood fiber which can make marker blending difficult.
This is not to say you can’t use Copics in journals, only that journal artists have to be picky about which journals they use and their technique is usually modified to reflect the unusual characteristics of the paper.
Of the artists who do journal with Copics, it is standard practice to skip pages and to use blotter paper to protect blank pages and previous art. Very few color back to back.
“Mixed media” journals are not developed for marker blending, even when they list marker on the label. Mixed media most often refers to paper which tolerates some water, has some tooth for pencil, and won’t bleed excessively with fine-line pens. A general rule is if the paper tolerates water, it probably doesn’t like alcohol ink because the two mediums have opposite needs.
I make my own journals using a spiral binding machine. I use chipboard (heavy cardboard) for the front and back cover and fill it with my choice of marker-friendly paper. Copy shops have commercial binding machines and many will assemble a journal using your paper for a small fee.
-
Copic Markers are made with dye and thus can be used as temporary colorant on fabric.
WARNING: Copic ink is not lightfast and often fugitive. Copic on fabric is temporary and can not be set like commercial dye. Copic will fade on fabric in a matter of weeks and will not withstand washing.
For best results, select fine-thread, tightly woven fabrics including silk, untreated cotton duck cloth (fine canvas), quilter’s grade cotton such as cotton lawn or poplin, or even tightly knit cotton jersey fabric such as quality tee-shirt material. Keep the project out of direct light and in rooms with moderate and stable temperature and humidity.
NOTE: UV sprays will not stop Copic from fading. Even so, most UV sprays use alcohol as a propellant which will cause spotting or other damage to Copic colored objects.
-
While Copic can be used on fabric (see “can I color on fabric” above) artist-grade painter’s canvas presents several problems for marker artists.
First understand that Copic ink is not lightfast and will noticeably fade in a matter of weeks. See my article here for why this fade can not be stopped. Before you start, consider the temporary nature of Copic ink and decide whether it’s your time to color on canvas.
Next, painter’s canvas tends to be a rougher grade canvas— made with thicker threads and a looser weave than the canvas used for shoes, bags, and apparel. This makes for a very bumpy coloring experience.
Next, stretched canvas has a bounce factor. Canvases are not a stable surface, they move under the brush or pencil. Excessive pressure can push divots or waves into the surface which will not heal. Even the weight of your hand can stretch the canvas creating a permanent dimple. Painter’s use long handled brushes to accommodate the bounce and prevent divots but you’re not so lucky with markers.
Now let’s address priming (or not priming) the canvas.
Raw canvas will be highly absorbent and drain markers very quickly. There’s also a rough quality to the thread used for artist canvas— it was meant to be primed and so the raw threads can have weird bits of grass or strange white and dark fibers which absorb ink differently. These thread flaws will show through Copic ink (which is transparent).
Painter’s canvas often comes pre-primed with a sealing product called gesso which is made from finely ground marble and white fillers. Depending upon the brand and finish, gesso can be oddly absorbent, others resist ink. Gesso feels gritty to the touch; this grit can rub off onto marker nibs leaving white residue on the nib which can be transferred to other projects. At the very least, gesso grit will cause excessive wear on your nib.
Many craft stores sell pre-primed canvas boards which often have a shiner gesso coating and less woven texture. Canvas boards are much more Copic friendly because they do not bounce and seem to take ink evenly without grit. They do not accept many layers of ink but they do work for light projects. I’ve taught classes using boards and they’re fun as a novelty technique… but I warned students that they may need to replace several nibs after the project.
-
In theory, you can use Copic Markers on a variety of wood surfaces. It depends upon the finish and I’m skeptical about whether the effort is worth it. Experiment to see if you can make it work.
As with all of these “can I color on _____” questions, please see my warnings above about how Copic Markers are not lightfast. For more info, see my in-depth article here.
On raw, untreated wood, Copic will likely bleed and feather. Ink likes to travel along fibers and wood is comprised of very long, very absorbent fibers. Expect to see the ink leech along the length of the woodgrain rather than across it.
Also note that untreated wood is not consistent. You may hit patches where the grain is tighter or looser and the ink will absorb differently in these areas. Pine may even contain resins which resist ink. Coloring on raw wood will not be smooth and I’m skeptical about how well you’ll blend.
For painted wood surfaces, understand that paint is not absorbent. You may get 1-2 layers of ink but it will not be smooth and some layers may actually remove previous layers of ink.
Oil-treated wood (such as cutting boards) and furniture treated with tongue oil or furniture polish will likely not absorb any Copic ink. Expect the ink to rub off with very little effort.
For varnished wood surfaces, be cautious. Some varnishes (especially antique sealants) are made with alcohol-soluble resin. Your Copics may permanently damage the finish and the finish will permanently damage your marker nib. Polyurethanes may be safer for Copic Ink but they’re moisture resistant which prevents smooth coloring, blending, and layering.
-
I do not recommend coloring on glass or acrylic. These are non-porous surfaces which will not absorb ink. If the ink doesn’t bead up, you’ll find it impossible to color smoothly. You’l also notice a weird “stripping” effect where any second layer of ink removes the first layer— the nibs actually collect this old ink, so you may end up with nibs stained with foreign colors.
Even if you were able to artfully apply ink to glass or acrylic, it will rub off with the slightest touch or accidental bump. There are other mediums (like glass paint) which do the job better and more inexpensively.
-
Do not use Copic Marker on dry erase boards. Dry boards are easily stained. Copic Marker will not wipe off easily and can leave behind a ghost image which may never come off.
If you do accidentally use Copic on a dry erase board, try rubbing the stain with a cotton pad soaked in 90% rubbing alcohol (Isoprophyl alcohol).
If the stain doesn’t lift with rubbing, try laying the board flat, placing a cotton pad soaked with rubbing alcohol over the stain, and letting this sit for several minutes. Before the pad has dried, try a bit more rubbing. At this point, you’ll have removed as much ink as you can. Further rubbing/soaking will not help. Remember, Copic ink does fade over time and with exposure to light, so perhaps you can encourage further fading of the stain by leaving it outside in the summer sun.
-
Copic ink is not water-soluble so if you’re asking whether water splashes or watercolor can smear Copic ink, the answer is no.
But most marker papers are highly sensitive to water. Several popular marker papers (such as X-Press It) will bubble or pill on contact with water and most others will wrinkle or wave.
-
All toner-based printers and commercial grade copy machines are safe for use with Copic Markers. This includes home office laser printers. Toner is not ink and toner machines heat-set the toner particles to the paper during the printing process. This insures that Copic Ink will not rehydrate or smear it printed lines.
For ink based printers, the answer is less clear. Some ink printers use Copic safe ink while others do not. I can’t even tell you to look for a certain brand because they all use a variety of ink.
In my experience, every HP printer I’ve owned has been Copic safe. There are also a few Canon machines I hear regularly mentioned. Models change each year so any recommendation I might make here could quickly be wrong when the new models come out.
I recommend joining a Copic discussion group to ask for recommendations on the latest model.
Recommended Copic Facebook Groups:
Vanilla Arts Chat (I am the group owner here)
Copic for Beginners (I am a co-owner of this group)
Coloring Collective ( I admin here)